Introduction to Embedded Systems
Creating Your First Arduino Program
Arduino IDE Software
Software to control the Arduino Uno microcontroller board is written in Arduino programming language, which is a subset of C++ with some Arduino-specific extensions (e.g. functions to handle the pins of the Arduino, discussed in the previous lesson). You write this code on your computer, in the Arduino IDE application, which you can download freely online and install on your computer.
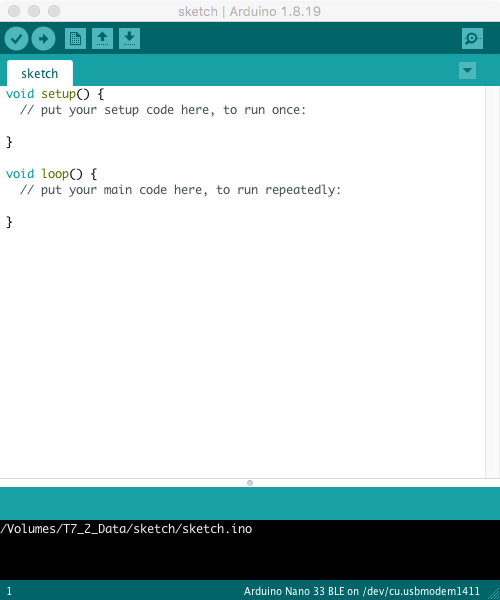
The program code you write for the Arduino is called a sketch and is by default stored in a file called sketch.ino on your computer. The image on the right shows such a file opened in an Arduino IDE window.
Illustrated is the default most minimal Arduino code consisting of an (empty) setup() and loop() function. In order to write your program, you will have to add additional code to these two functions.
Once you are done writing your program, you can compile and upload the program onto the Arduino (which needs to be connected to your computer via a USB cable) by pressing the compile/upload/run button in the Arduino IDE application. You can see this button on the upper left of the Arduino IDE Software window shown on the right (it is the round button with the right arrow in it).
Once the program is uploaded, it will automatically start running on the Arduino Uno.
If you have made a syntax error during programming (e.g. forget a semicolon at the end of an instruction line or use a variable, which you have not previously declared), the Arduino IDE software will abort the compilation process and will ask you to fix the error.
Basic Structure of Arduino Programs
Let us look at the most basic, general structure of an Arduino program. The simplest possible sketch.ino file looks like this:
void setup() {
  // put your setup code here, to run once:

}

void loop() {
  // put your main code here, to run repeatedly:

}
By default it contains two functions. The setup() function is run only once, when the program starts. After that, the loop() function is run through repeatedly until you turn the Arduino Uno off. Note that everything after a double slash (//) is a comment for human readers and ignored by the code processor.
Do not rename the two functions setup() and loop(). They are a standard part of Arduino language. In the body of these two functions, you can write your code. You can define additional functions (outside of these two functions) if you like, but you must call them from within these two functions in order to execute them. We will learn about all of this in future lessons.
Arduino language also supports classes and object-oriented programming. It does not support dynamic allocation of arrays though (malloc() from C/C++ does not exist in Arduino language).
A First Simple Program
Let us write a first simple program, which actually does something. The program below contains a variable called \(x\), which starts at a value of 10 and is increased by 3 every time the loop runs.
int x;

void setup() {
  // put your setup code here, to run once:

  x = 10;
}

void loop() {
  // put your main code here, to run repeatedly:

  x = x + 3;
}
In the above code, we have first declared (and defined) \(x\) as a global variable (i.e. we made the code processor aware that we wish that such a variable shall exist and what its data type is). \(x\) being a global variable means, that the variable will exist throughout the whole program (as opposed to local variables, which exist only within a function, and cease to exist, once the function ends). We have made sure that \(x\) is a global variable by writing its declaration at the beginning of the program outside of any function.
Next, in function setup(), which runs only once, the variable \(x\) is initialized to a value of 10. Before this line, (x) existed, but it had no value. Now it contains the value 10.
Then the loop() function start running repeatedly. Each time the loop runs, the value of \(x\) is increased by 3.
Comments
First of all, note that we put ever separate instruction to the computer on a separate line. In C/C++ such lines containing an instruction always end with a semicolon. Therefore, the declaration of variable \(x\) as well as its initialization and later incrementation all end with a semicolon.
Second, note that expression x = x + 3 in the code is not an equation; it is an assignment. This means, the computer does not try to solve it for \(x\). Instead, first the right-hand side of the expression is computed. Then this value is assigned to the variable on the left-hand side.
The first time this line is encountered, \(x=10\). The computer computes \(x + 3 = 10 + 3 = 13\). This value of 13 is then assigned to the variable \(x\). again. Now \(x\) is not 10 anymore, but rather \(x=13\).
The next time the line x = x + 3 is encountered, the computer computes x + 3 = 13 + 3 = 16, and assigns this new value to \(x\) again. \(x\) is not 13 anymore, now we have \(x=16\). And so forth upon each further pass through the loop() function.
Output?
We will talk about programming in C/C++ more later. Right now, we have another problem. If you run the above code on an Arduino (or an Arduino simulator), you will not see anything. This is, because we have not asked the Arduino to output anything. Perhaps equally importantly, we do not even know, where the Arduino would output things.
This is where the so called Serial Monitor comes in. It provides a means for the Arduino to transfer information back to your connected main computer, which the Arduino IDE software then displays in a window on your computer screen. You can open the Serial Monitor window in the Arduino IDE software by pressing the magnifying glass button in the in the upper right-hand corner of the Arduino IDE software window shown above.
Alternatively, we could also connect some hardware, e.g. a small LCD or OLED display like this one, to the Arduino Uno. We will first look at the Serial Monitor in the next lesson and at connecting physical displays (as well as input devices such as a keypad) much later.